Planning & Assessment
Planning and assessment are crucial first steps in your solar panel installation journey. Thorough evaluation ensures a system that optimally meets your energy needs and complies with all regulations. This section details the key aspects to consider before commencing installation.
Home Suitability Evaluation
Determining your home’s suitability involves several factors. Firstly, assess your roof’s orientation and angle. South-facing roofs (in the Northern Hemisphere) receive the most sunlight, maximizing energy production. Steeper roofs generally offer better performance, as they minimize shading and snow accumulation. Next, consider shading from trees, buildings, or other obstructions. Even slight shading can significantly impact energy output. A detailed analysis of your roof’s characteristics, including its material (e.g., asphalt shingles, tile, metal), size, and structural integrity, is necessary to ensure compatibility with the planned solar panel system. Finally, consider the availability of suitable electrical infrastructure within your home to connect the system.
Permitting and Approvals
Obtaining the necessary permits and approvals is a critical legal and safety requirement. This process varies depending on your location. The checklist below Artikels common requirements:
- Building permit: This is usually required for any structural modifications to your roof.
- Electrical permit: This permit covers the electrical work involved in connecting the solar panel system to your home’s electrical grid.
- Homeowners association (HOA) approval: If applicable, your HOA may have specific regulations regarding solar panel installations.
- Fire department inspection: A fire inspection may be required to ensure the system’s safety.
- Utility company approval: Your utility company needs to approve the connection of your solar panel system to the grid, outlining the net metering agreement (if applicable).
It’s recommended to contact your local building department and utility company early in the planning process to understand the specific requirements in your area.
Optimal Solar Panel System Size Calculation
Calculating the optimal system size involves determining your home’s energy consumption and matching it with the energy production capacity of the solar panel system. This typically requires analyzing your monthly electricity bills to determine your average energy usage. You’ll need to consider factors such as household size, appliance usage, and energy-efficient practices. Software tools and online calculators can assist in estimating the required system size based on your energy consumption and the solar irradiance in your location. A professional solar installer can provide a more precise calculation, taking into account various factors like roof orientation, shading, and panel efficiency. For example, a household with an average monthly energy consumption of 800 kWh might require a 5 kW solar panel system, but this is a rough estimate and needs further refinement based on individual circumstances. The formula for calculating system size is generally:
System Size (kW) = Annual Energy Consumption (kWh) / (Annual Sun Hours * System Efficiency)
Note that system efficiency varies based on the panels and inverters used.
Solar Panel Types
Several types of solar panels are available, each with its own advantages and disadvantages. The choice depends on factors like budget, aesthetic preferences, and performance requirements.
| Panel Type | Pros | Cons | Efficiency Range |
|---|---|---|---|
| Monocrystalline Silicon | High efficiency, aesthetically pleasing, long lifespan | Higher cost | 18-22% |
| Polycrystalline Silicon | Lower cost than monocrystalline, good efficiency | Lower efficiency than monocrystalline, less aesthetically pleasing | 15-17% |
| Thin-Film (Amorphous Silicon, Cadmium Telluride, Copper Indium Gallium Selenide) | Flexible, lightweight, can be installed on various surfaces | Lower efficiency, shorter lifespan than crystalline silicon | 5-13% |
| Perovskite | High potential efficiency, lightweight, flexible | Relatively new technology, long-term stability still under research | 25%+ (potential) |
System Design & Procurement
Designing and procuring your solar panel system is a crucial step, ensuring your system meets your energy needs and operates efficiently. This involves careful planning, selection of high-quality components, and understanding the system’s overall architecture. A well-designed system maximizes energy production and minimizes potential issues.
Solar Panel System Layout Design
Designing the layout considers several key factors, primarily roof orientation and shading. Optimal placement maximizes sunlight exposure. South-facing roofs (in the Northern Hemisphere) generally receive the most sunlight throughout the day. However, even with a less-than-ideal orientation, a well-designed system can still be highly effective. Shading from trees, buildings, or other structures significantly reduces energy production. Detailed analysis using software or professional consultation is often beneficial to determine the best panel placement to minimize shading and maximize energy capture. This involves considering the sun’s path throughout the year and identifying potential shading sources at different times of the day. The design should also account for roof structural integrity and building codes.
Reputable Solar Panel Manufacturers and Suppliers
Choosing reputable manufacturers and suppliers is vital for system reliability and longevity. Several well-established companies consistently receive positive reviews and demonstrate commitment to quality. Examples include SunPower, Panasonic, LG, and Trina Solar, known for their high-efficiency panels and robust warranties. Suppliers often provide comprehensive packages including installation services and system monitoring. It’s crucial to research and compare offerings from various suppliers, considering factors such as panel efficiency, warranty terms, and customer support. Local suppliers often provide better service and quicker response times for maintenance or repairs.
Inverter and Component Selection
The inverter is a critical component, converting the direct current (DC) electricity generated by the solar panels into alternating current (AC) electricity usable in your home. Choosing an inverter with appropriate power capacity and features is important. String inverters are commonly used for smaller systems, while microinverters offer greater flexibility and potential for increased energy production in partially shaded conditions. Other essential components include mounting hardware, wiring, disconnects, and monitoring equipment. The selection process involves considering system size, energy needs, and budget constraints. Professional installers can assist in selecting components compatible with your specific system design and requirements.
Typical Solar Panel System Components Diagram
[Imagine a diagram here showing the following components and their connections. Text descriptions are provided below.]
Solar Panels: These are the photovoltaic (PV) modules that convert sunlight into DC electricity. They are typically arranged in arrays on the roof.
Mounting System: This system securely attaches the solar panels to the roof, ensuring stability and proper orientation towards the sun. Different mounting systems are used depending on roof type.
Wiring: Conduits and cables connect the solar panels to the inverter, ensuring efficient transfer of DC electricity.
Inverter: This converts the DC electricity from the panels into AC electricity compatible with household appliances.
Meter: Monitors energy production and consumption, providing valuable data for system performance analysis.
Main Electrical Panel: The AC electricity from the inverter is fed into the main electrical panel of the house, distributing power to various circuits.
Disconnects: Safety switches that allow for isolation of the solar panel system for maintenance or emergencies.
Roof Preparation & Mounting

Preparing your roof for solar panel installation is a crucial step, ensuring both the safety of the installers and the longevity of your solar system. This involves a thorough inspection and cleaning to create a stable and secure mounting surface. Proper preparation will prevent future issues and ensure optimal system performance.
Roof Inspection and Cleaning
A comprehensive roof inspection is paramount before any installation begins. This involves checking for any damaged shingles, loose flashing, or areas of potential water leakage. Any such issues must be repaired before proceeding. The roof surface should also be thoroughly cleaned to remove debris such as leaves, twigs, and dirt. This ensures the mounting system adheres properly and prevents shadows that could reduce energy production. A pressure washer can be effective, but care should be taken to avoid damaging the roofing material. For fragile tiles, a soft brush and appropriate cleaning solution might be preferable. Inspecting for any existing obstructions, such as satellite dishes or chimneys, is also vital for planning the optimal panel placement. Documentation of the pre-installation condition is highly recommended, including photographic evidence.
Mounting System Installation
Several mounting systems exist, each suited to different roof types and panel configurations. Rack mounting systems are common for asphalt shingle roofs, involving the attachment of rails to the roof using specialized fasteners. Ballast mounting, often used for flat roofs, utilizes weighted bases to secure the panels without penetration. Other systems include integrated flashing, which is incorporated into the roof during construction, and tile-integrated systems which are designed to blend seamlessly with tile roofs. The choice of mounting system depends on the roof type, the weight of the solar panels, and local building codes. Always consult with a qualified installer to determine the most suitable option.
Rack Mounting System Installation
- Attaching Rails: Imagine a picture showing pre-drilled holes in the roof’s supporting structure. The installer carefully positions the mounting rails, aligning them with the planned panel layout. The rails are then secured using appropriate fasteners, ensuring a firm and level base for the panels. The fasteners should be chosen based on the roofing material and designed to penetrate the supporting structure effectively.
- Mid-Clamp Installation: The image shows mid-clamps being positioned along the rails. These clamps provide additional support and stability to the solar panels. They’re precisely aligned and securely fastened to the rails, ensuring a robust connection.
- Panel Attachment: The final step shows the solar panels being carefully lifted and placed into the clamps. Each panel is secured using end clamps or similar fastening mechanisms, ensuring a tight and secure fit. The installer verifies the electrical connections are correctly made at this stage.
Safety is paramount when working at heights. All installers should wear appropriate safety harnesses and use fall protection systems. Proper scaffolding or other elevated work platforms should be utilized to provide a stable and secure working environment.
Ballast Mounting System Installation
- Base Placement: The image displays weighted ballast bases being strategically placed on the flat roof. These bases provide the necessary weight to secure the panels and are positioned to distribute the weight evenly. The bases should be placed on a clean and level surface.
- Panel Mounting: The next image shows the solar panels resting securely on the ballast bases. The panels are carefully positioned and adjusted to ensure optimal alignment and spacing. Additional weights or clamps may be used to further secure the panels, especially in windy conditions. The installer will carefully inspect the alignment of each panel to maximize energy production.
- Electrical Connections: The final image shows the installer making the necessary electrical connections between the panels and the inverter. These connections are carefully secured to ensure a safe and efficient transfer of energy. This step should be performed in accordance with the manufacturer’s instructions and local electrical codes.
Always ensure the ballast system is appropriately weighted for the anticipated wind loads and the weight of the solar panels. Regular inspections should be carried out to ensure the system remains stable and secure.
Wiring & Connections
This section details the crucial process of connecting your solar panels to your home’s electrical system. Proper wiring is essential for system efficiency and safety. Improper connections can lead to system malfunction, fire hazards, and potential injury. Always prioritize safety and, if unsure about any aspect of this process, consult a qualified electrician.
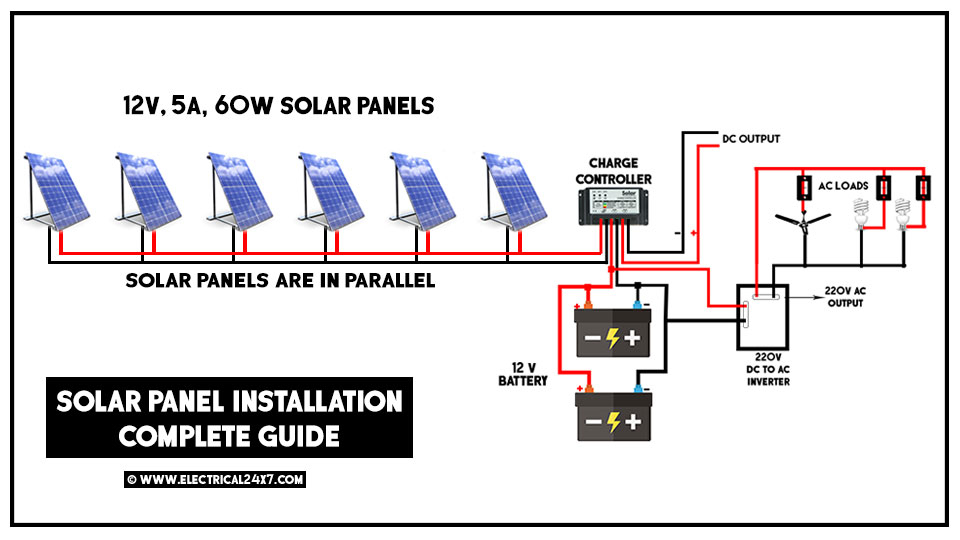
Wiring solar panels involves connecting the panels in series or parallel configurations to the inverter, which converts the DC power generated by the panels into AC power usable in your home. The inverter is then connected to your home’s electrical panel, allowing the solar power to feed into your home’s electrical system. This process requires careful attention to detail and adherence to all relevant electrical codes and safety regulations.
Wiring Solar Panels to the Inverter
This process involves connecting the positive (+) and negative (-) wires from each solar panel to the input terminals of the inverter. The specific wiring configuration (series or parallel) depends on the system design and the voltage requirements of the inverter. Always disconnect the system from the power source before making any connections. Use appropriately sized and rated wiring to avoid overheating and potential fire hazards. Crimp connectors should be used to ensure secure and reliable connections. After making all connections, carefully inspect the wiring for any loose connections or damage.
Connecting the Inverter to the Home’s Electrical Panel
The inverter’s output is AC power, which needs to be connected to your home’s electrical panel through a properly sized and rated breaker. This connection must be made by a qualified electrician who will ensure the connection complies with all relevant electrical codes and safety regulations. The electrician will install a dedicated circuit breaker for the solar power system, providing a safe and controlled pathway for the solar power to integrate with your home’s electrical system. This connection point will be carefully inspected for proper grounding and bonding, ensuring the safety of the system and its users. The inverter should also be equipped with appropriate safety features such as overcurrent protection and ground fault protection.
Wiring Diagram of a Typical Solar Panel System
Imagine a diagram showing several solar panels connected in series (positive to negative, creating a higher voltage) and then those series strings connected in parallel (positives together, negatives together) to increase current capacity. These strings lead to the input terminals of the string inverter. The inverter has output terminals connected to an AC disconnect switch, then to a dedicated circuit breaker on the main electrical panel of the house. Labels should clearly indicate: Solar Panels (+ and – terminals), Series Strings, Parallel Connections, Inverter (Input and Output Terminals), AC Disconnect Switch, Main Electrical Panel, Circuit Breaker, and Grounding Wire.
Comparison of Wiring Methods
Series wiring connects panels in a chain, increasing voltage but keeping the current the same. This is suitable for systems with long distances between panels and the inverter, minimizing voltage drop. Parallel wiring connects panels side-by-side, increasing current but maintaining voltage. This is beneficial for systems needing higher current capacity but shorter distances. A combination of series and parallel wiring (series-parallel) is commonly used to optimize both voltage and current for the specific system requirements. The choice depends on the system’s size, panel specifications, inverter requirements, and the distance between the panels and the inverter. Series wiring can be more susceptible to shading issues, as a single shaded panel can impact the entire string’s performance. Parallel wiring is more resilient to shading, but requires thicker cables to handle the higher current.
Inverter Installation & Configuration
The inverter is the heart of your solar power system, converting the DC electricity generated by your solar panels into AC electricity usable in your home. Proper installation and configuration are crucial for maximizing system efficiency and ensuring safe operation. This section details the process, including programming for optimal performance and troubleshooting common issues.
Inverter installation requires careful attention to safety and adherence to manufacturer instructions. Always disconnect the system from the power grid before beginning any work and consult with a qualified electrician if you are unsure about any aspect of the installation.
Inverter Mounting and Wiring
Securely mount the inverter in a well-ventilated, dry location, following the manufacturer’s specifications. This typically involves using appropriate mounting hardware and ensuring sufficient clearance for heat dissipation. The location should be easily accessible for maintenance and monitoring. Next, connect the DC cables from the solar array to the inverter’s DC input terminals, ensuring correct polarity (+ and -). Similarly, connect the AC output cables from the inverter to your home’s electrical panel, adhering to all local electrical codes and using appropriate breakers and disconnects. Always double-check all connections before proceeding.
Inverter Programming and Optimization
Most inverters have built-in programming options accessible via a display screen or a computer interface. These settings allow you to optimize the system’s performance based on factors like the size of your solar array, the characteristics of your electrical grid, and your energy consumption patterns. Common parameters include maximum power point tracking (MPPT) settings, grid voltage and frequency settings, and power limits. Consult your inverter’s manual for detailed instructions on programming and setting these parameters appropriately. Incorrect settings can lead to reduced efficiency or even system malfunction. For example, setting the MPPT voltage range too narrow might prevent the inverter from fully utilizing the available solar power.
Troubleshooting Inverter Malfunctions
Inverter malfunctions can manifest in various ways, such as a complete lack of power output, reduced power output, or error codes displayed on the inverter’s screen. Troubleshooting should begin with a visual inspection of all connections, ensuring that all cables are securely connected and that there are no signs of damage or overheating. Check the inverter’s circuit breakers and ensure they are in the “ON” position. Consult your inverter’s manual for a list of error codes and their corresponding solutions. If the problem persists, contact a qualified solar technician for assistance. For instance, an error code indicating a grid fault might require checking the connection to your home’s electrical panel and ensuring the grid is functioning correctly.
Comparison of Inverter Types
Different inverter types offer various advantages and disadvantages. The choice depends on factors like system size, budget, and desired performance characteristics.
| Inverter Type | Advantages | Disadvantages |
|---|---|---|
| String Inverter | Cost-effective, relatively simple installation | Performance impacted by shading on a single panel, single point of failure |
| Microinverter | Individual panel optimization, higher efficiency even with shading, improved safety | Higher initial cost, more complex installation |
| Power Optimizer | Combines benefits of string and microinverters, offering panel-level optimization at a lower cost than microinverters | More complex than string inverters, still susceptible to shading effects to a lesser extent than string inverters. |
Electrical Panel Integration
Integrating your solar panel system into your home’s electrical panel is a crucial final step, connecting your newly generated power to your home’s existing electrical grid. This process requires careful attention to safety and adherence to local electrical codes to ensure a safe and efficient system. Improper integration can lead to electrical hazards and system malfunctions.
This section details the procedure for connecting your solar array to your home’s electrical panel, highlighting necessary safety measures and the inspection process. We will also provide a checklist to ensure everything is correctly installed before activating your system.
Safety Precautions During Electrical Panel Integration
Working with electricity requires extreme caution. Before beginning any work on your electrical panel, always disconnect the main power supply to the panel. This is crucial to prevent electric shock and potential injury. Use a properly rated lockout/tagout system to ensure the power remains off while working. Wear appropriate safety gear, including insulated gloves and safety glasses. If you are not comfortable working with electricity, it’s highly recommended to hire a qualified electrician to perform this task. They possess the expertise and experience to safely and correctly integrate the solar system.
Connecting the Solar System to the Electrical Panel
The specific process of connecting your solar system to your electrical panel will depend on the design of your system and the configuration of your panel. Generally, this involves connecting the output wires from your solar inverter to the designated spaces within your electrical panel. These spaces will likely house a new circuit breaker dedicated to your solar system. The connection must be made according to the wiring diagram provided by your solar installer and in strict adherence to local electrical codes. This often involves using appropriate wire connectors and ensuring all connections are secure and properly grounded. A qualified electrician will use specialized tools to ensure proper torque on connections, preventing loose wires that could cause overheating or fire hazards. Incorrect wiring can lead to system malfunction or even fire. A common mistake is improper grounding, which can result in serious electrical hazards.
Obtaining Inspections and Approvals
Once the integration is complete, you will need to schedule an inspection with your local electrical authority. This inspection verifies that the installation complies with all relevant codes and safety regulations. The inspector will check all connections, grounding, and the overall system integration to ensure everything is up to code. Obtaining approval is essential to ensure the safety and legality of your solar system. Failure to obtain proper inspection and approval could result in fines or even the need for system modifications or removal. The specific requirements for inspection and approval vary by location; check with your local authority for details.
Pre-Activation Checklist
Before turning on your newly installed solar system, it is critical to perform a thorough check to ensure everything is correctly installed and functioning as designed. This checklist is a guide and may not be exhaustive; always refer to your installer’s instructions.
- Verify that all electrical connections are secure and properly grounded.
- Confirm that the main breaker for your solar system is in the OFF position.
- Inspect all wiring for any signs of damage or loose connections.
- Ensure all protective devices, such as circuit breakers and fuses, are properly installed and functioning.
- Check that the inverter is correctly configured and communicating with the monitoring system (if applicable).
- Review the electrical panel layout to confirm all connections are in accordance with the design and local codes.
- Ensure that the grounding system is properly connected and meets all safety standards.
Following this checklist minimizes the risk of problems after turning on the system. Remember, if you have any doubts or uncertainties during any stage of the process, contact a qualified electrician.
System Testing & Commissioning
System testing and commissioning are crucial final steps in your solar panel installation. This phase ensures your system operates safely and efficiently, meeting the expected energy production targets. Thorough testing identifies any potential problems before they escalate into larger, more costly issues. Commissioning involves verifying the system’s compliance with relevant codes and regulations, ultimately leading to final approval and system activation.
System Performance Testing Procedures
Testing the solar panel system involves a series of checks to validate its functionality. These tests ensure all components are working correctly and integrated seamlessly. This includes verifying the correct voltage and current output of the panels, the efficiency of the inverter, and the proper functioning of all safety mechanisms. Testing should be conducted under various conditions, including peak sunlight and partial shading, to ensure consistent performance. Specialized equipment, such as multimeters and data loggers, are typically used to record and analyze system performance data. A visual inspection of all connections and components is also necessary to identify any signs of damage or loose wiring.
Commissioning and Obtaining Approvals
Commissioning involves a comprehensive assessment to confirm the solar panel system’s compliance with all relevant building codes, electrical regulations, and safety standards. This usually involves a thorough inspection by a qualified electrician or a certified solar installer. The inspection will cover aspects such as proper grounding, wiring configurations, inverter settings, and overall system safety. Once the inspection is completed and any necessary corrections are made, the commissioning process culminates in the issuance of a certificate of compliance or a similar document, officially approving the system for operation. This document is essential for obtaining insurance coverage and potentially for receiving any applicable government incentives.
Common System Performance Metrics and Interpretation
Several key metrics are used to assess the performance of a solar panel system. These metrics provide valuable insights into the system’s efficiency and overall health.
- DC Power Output: This measures the power generated by the solar panels before it is converted by the inverter. A lower-than-expected DC output could indicate shading, faulty panels, or wiring issues.
- AC Power Output: This measures the power supplied to the home after the inverter converts the DC power to AC. Low AC output might indicate problems with the inverter or other downstream components.
- Inverter Efficiency: This represents the percentage of DC power converted to usable AC power. Lower efficiency suggests potential problems with the inverter’s functionality.
- Energy Yield: This measures the total amount of energy produced over a specific period, often measured in kilowatt-hours (kWh). Lower-than-expected energy yield could be due to various factors, including weather conditions, system faults, or shading.
Understanding these metrics allows for proactive identification of potential problems and ensures the system operates at peak efficiency.
Potential Issues and Troubleshooting Steps During Commissioning
Several issues might arise during the commissioning phase. Early detection and proper troubleshooting are vital for ensuring optimal system performance.
- Low Power Output: This could be caused by shading, faulty panels, wiring problems, or inverter malfunctions. Troubleshooting involves checking panel output individually, inspecting wiring connections, and verifying inverter functionality.
- Grounding Issues: Improper grounding poses a significant safety hazard. A qualified electrician should verify proper grounding connections according to local electrical codes.
- Inverter Errors: Modern inverters often display error codes indicating specific problems. Consulting the inverter’s manual for troubleshooting these codes is crucial.
- Overheating: Overheating can damage components. Checking for proper ventilation and ensuring sufficient airflow around the inverter and panels is important.
Addressing these potential issues promptly ensures a safe and efficient solar panel system.
Maintenance & Monitoring
Regular maintenance and monitoring are crucial for ensuring the longevity, efficiency, and safety of your home solar panel system. Neglecting these aspects can lead to performance degradation, potential safety hazards, and reduced energy production, ultimately impacting your return on investment. This section Artikels a comprehensive maintenance schedule and troubleshooting guide to help you keep your system running smoothly.
Regular Maintenance Schedule
A proactive approach to maintenance is key. This involves a combination of regular cleaning, visual inspections, and performance monitoring. Adhering to a scheduled maintenance plan minimizes the risk of costly repairs and ensures optimal system performance. The frequency of certain tasks may vary based on your specific environment (e.g., dusty or snowy climates may require more frequent cleaning).
| Maintenance Task | Frequency | Description |
|---|---|---|
| Panel Cleaning | Quarterly (or more frequently in dusty/polluted areas) | Gently remove dirt, leaves, and debris from solar panels using a soft brush, sponge, and water. Avoid harsh chemicals. |
| Visual Inspection | Monthly | Check for any visible damage to panels, wiring, mounting hardware, or the inverter. Look for loose connections, cracks, or signs of animal infestation. |
| Inverter Inspection | Quarterly | Inspect the inverter for any error messages, unusual sounds, or overheating. Check all connections and ensure proper ventilation. |
| Performance Monitoring | Monthly (via monitoring software or online portal) | Review energy production data to identify any significant drops in output or unusual patterns. |
| Grounding Check | Annually (by a qualified electrician) | Verify the integrity of the grounding system to ensure safety and prevent electrical shocks. |
Common Issues and Solutions
Several common issues can affect solar panel system performance. Early detection and prompt resolution are essential to prevent escalation and minimize downtime.
| Issue | Solution |
|---|---|
| Dirty Panels | Clean panels regularly as described above. Consider a pressure washer (low pressure) for stubborn dirt. |
| Shading | Trim overhanging branches or other obstructions that cast shadows on panels. Optimize panel placement during initial installation to minimize shading. |
| Loose Connections | Tighten any loose wiring connections. If unsure, consult a qualified electrician. |
| Inverter Malfunction | Check for error codes and consult the inverter’s manual for troubleshooting. Contact the manufacturer or a qualified technician if the problem persists. |
| Panel Damage | Repair or replace damaged panels. Contact your installer or panel manufacturer for warranty information. |
Monitoring System Performance
Most modern solar inverters come equipped with monitoring capabilities, either through a physical display on the inverter itself or via a web-based portal or mobile app. These tools provide real-time data on energy production, system efficiency, and potential issues. For example, a homeowner might notice a sudden drop in energy production through their monitoring app, prompting them to investigate potential causes such as shading or a malfunctioning component. Regular review of this data allows for early detection of problems and proactive maintenance. Some systems allow for remote monitoring and diagnostics, enabling technicians to troubleshoot remotely, saving time and money.
Safety Precautions Throughout the Process
Installing solar panels involves working at heights, with electricity, and potentially with sharp tools. Prioritizing safety is paramount throughout every stage of the project, from initial planning to final system commissioning. Neglecting safety measures can lead to serious injury or even death. This section details crucial safety precautions to ensure a safe and successful solar panel installation.
Safety should be considered not just as a separate step, but as an integral part of every step in the installation process. Thorough planning and preparation are key to mitigating risks. This includes obtaining necessary permits, conducting thorough site assessments, and familiarizing yourself with all equipment before beginning any work.
Working Safely at Heights
Working on rooftops presents significant fall hazards. Appropriate fall protection measures are essential. This includes the use of harnesses, safety lines, and anchor points securely attached to the roof structure. Before commencing work, inspect all equipment for damage or wear. Ensure that the roof is structurally sound and capable of supporting the weight of the installers and equipment. Regular communication with colleagues is crucial, especially when working in tandem. A designated spotter can help prevent accidents and ensure safety procedures are followed. In some cases, scaffolding or elevated work platforms may be necessary to minimize fall risks, particularly for larger or more complex roof structures.
Safe Handling of Electrical Equipment
Solar panel systems operate with direct current (DC) electricity, which can be lethal. Before commencing any work involving electrical components, ensure the system is completely de-energized. This involves disconnecting the solar panels from the inverter and the inverter from the main electrical panel. Use appropriate lockout/tagout procedures to prevent accidental re-energization. Always use insulated tools and gloves to prevent electric shock. Never work on live electrical components unless you are a qualified electrician with the appropriate safety training and equipment. Regularly inspect electrical components for any signs of damage or wear. If any issues are found, immediately cease work and contact a qualified electrician for repairs.
Personal Protective Equipment (PPE)
Appropriate PPE is crucial for protecting against various hazards during the installation process. This includes:
- Safety helmets to protect against falling objects.
- Safety glasses or goggles to protect eyes from debris and UV radiation.
- Work gloves to protect hands from cuts, abrasions, and electric shock.
- Steel-toe boots to protect feet from falling objects and sharp materials.
- Fall arrest harness and lanyard when working at heights.
- Hearing protection when using power tools.
All PPE should be regularly inspected and replaced when necessary to ensure its effectiveness.
Emergency Procedures
Having a well-defined emergency plan is crucial. This should include procedures for handling various scenarios, such as:
- Falls from heights: Immediate first aid, contacting emergency services, and securing the area.
- Electric shock: Immediately disconnecting the power source, performing CPR if necessary, and contacting emergency medical services.
- Equipment malfunctions: Securing the area, de-energizing equipment, and contacting a qualified technician for repairs.
- Fire: Evacuating the area, contacting emergency services, and using appropriate fire extinguishers if trained and safe to do so.
Regularly review and practice emergency procedures to ensure everyone on the installation team is familiar and prepared.
FAQ
Can I install solar panels myself, or do I need a professional?
While some aspects of installation can be DIY, professional installation is generally recommended due to the complexity and safety concerns involved with electrical work and working at heights. Consult with qualified professionals to determine the best approach for your specific circumstances.
How long does the entire solar panel installation process take?
The timeframe varies depending on the system size, roof complexity, and permitting processes. Expect the process to take several weeks to several months from initial planning to final commissioning.
What is the average cost of installing solar panels?
The cost depends on numerous factors, including system size, panel type, location, and labor costs. It’s best to obtain quotes from multiple installers to get a realistic estimate for your specific needs.
What kind of permits and approvals are needed?
Permits and approvals vary by location. You’ll typically need building permits, electrical permits, and potentially HOA approvals. Check with your local authorities for specific requirements.
How long do solar panels last?
High-quality solar panels typically have a lifespan of 25-30 years or more, with performance gradually declining over time. Manufacturers often offer warranties covering performance degradation.